Editor’s note: Martin has written for the magazine several times, most notably about Icehenge, a recreation of Stonehenge in ice, and Wienhenge, an outrageous sun dial project. You can search our website to find all of Martin’s articles.
Although I may be preaching to the choir on some of the aspects of equipment with a major digression into things astronomical regarding surveying, it is necessary in part to familiarize you with the whole picture of my venture.
Surveyors’ equipment before the advent of GPS, went through the gamut of optical devices ranging from compass configurations to EDM and total stations. All of these were using some form of a telescope that was a classic refractor mostly on a mount that gimbled in altitude and azimuth/bearing readings for the older transits or with horizontal and zenith angles for the theodolites. The range of magnifications was anywhere from maybe 20 to 40 powers with objective lens diameters from an inch to 50 or 60 mm.
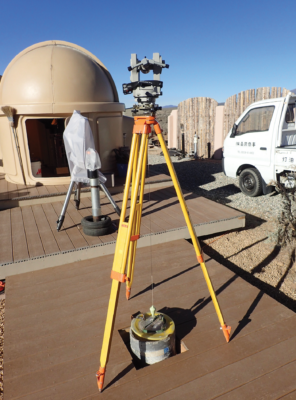
This is the setup with the Sokkia TM-6 theodolite used to set the bearing of the azimuth line from the north property line to the telescope pier. Note the use of a plumb bob even though it had an optical plummet tribrach it was easier to use over the center mark of the bolts on the concrete pier.
Over the decades I have owned a classic K&E Engineers transit in its hard wooden box, Wild’s (Swiss pronounced VILT not wild animals) theodolites, Leitz, Sokkia and Sokkisha before they were bought out by Topcon, and a few Leica’s. Some of these were also available with zenith eyepiece attachments to see above 50 degrees altitude and solar filters for sun shots. I had a solar reticle for my Leitz TH-43 that had not only the standard cross hairs but a circular outline of the diameter of the sun, so you didn’t have to choose between the upper or lower and the eastern or western trailing sides of the sun. This made shots safer because I employed a projection method using a piece of white cardboard or a transit book to shine the sun onto. Solar shots too could be accommodated with a very dangerous dark glass filter that attached over the eyepiece. I say the dark filters were dangerous because if cracked from the heat of the sun you could spot weld your retinas in a second. But the projection method was hard on the eyepiece such that it delaminated the lens in the eyepiece making it cloudy in the process. Accordingly projecting the sun though an EDM or total station would probably fry the light pipe in the optics for the fiber optic connection of the infrared distance measurements. Probably today if you want to take sun shots it can be safely done with an aluminized mylar filter that subtracts 99% of the sunlight over the objective lens rather than at the eyepiece.
I own a pair of zenith eyepiece attachments where you must unscrew the standard ones for the separate focuser and window to read the angles to install the 90-degree prisms. They can be used on any Sokkisha or Sokkia theodolites of which I have a TCM-20 second gun and a TM-6 second one. I am building a concrete pier for one of my telescopes at an observatory I have constructed in Taos, NM that needs to be polar aligned to track the stars accurately with a computer driven motor drive.
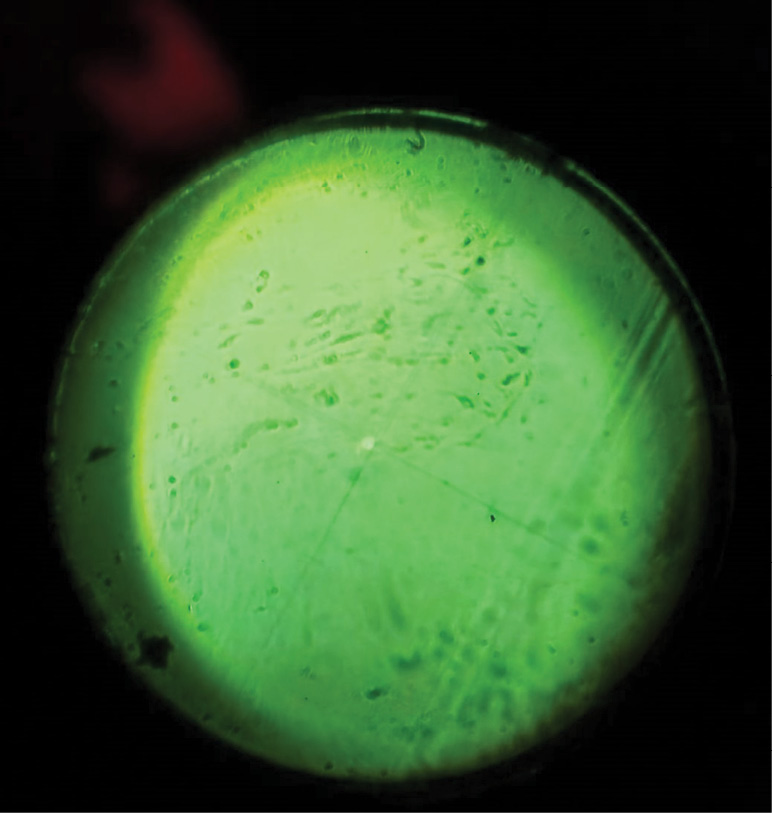
This is a shot of the image through the TM-6 that shows how murky and fuzzy it was because the cross hairs were illuminated by a small prism in the light path behind the reticle. It lit up all the dust in back of the graticule. Polaris was set slightly out of focus to make it easier to see for centering.
Let’s digress a bit into telescope mounts and types. I have five flavors all of which have different mounts. Although there are mainly two types of telescopes; refractors and reflectors they can be mounted differently. There are also different ways in which these two types of optics can be configured.
One reflector type uses mirrors to bounce the light around that can be at what’s called Cassegrain focus with a second mirror to shoot the reflected image back through a hole in the primary mirror and out the back. These are called Schmidt Cassegrain’s or folded optics. A Newtonian, named after Isaac Newton in 1668 who made the first one, the primary mirror shoots the light up the tube that’s intersected by a right-angle prism in the middle and out the side into the eyepiece.
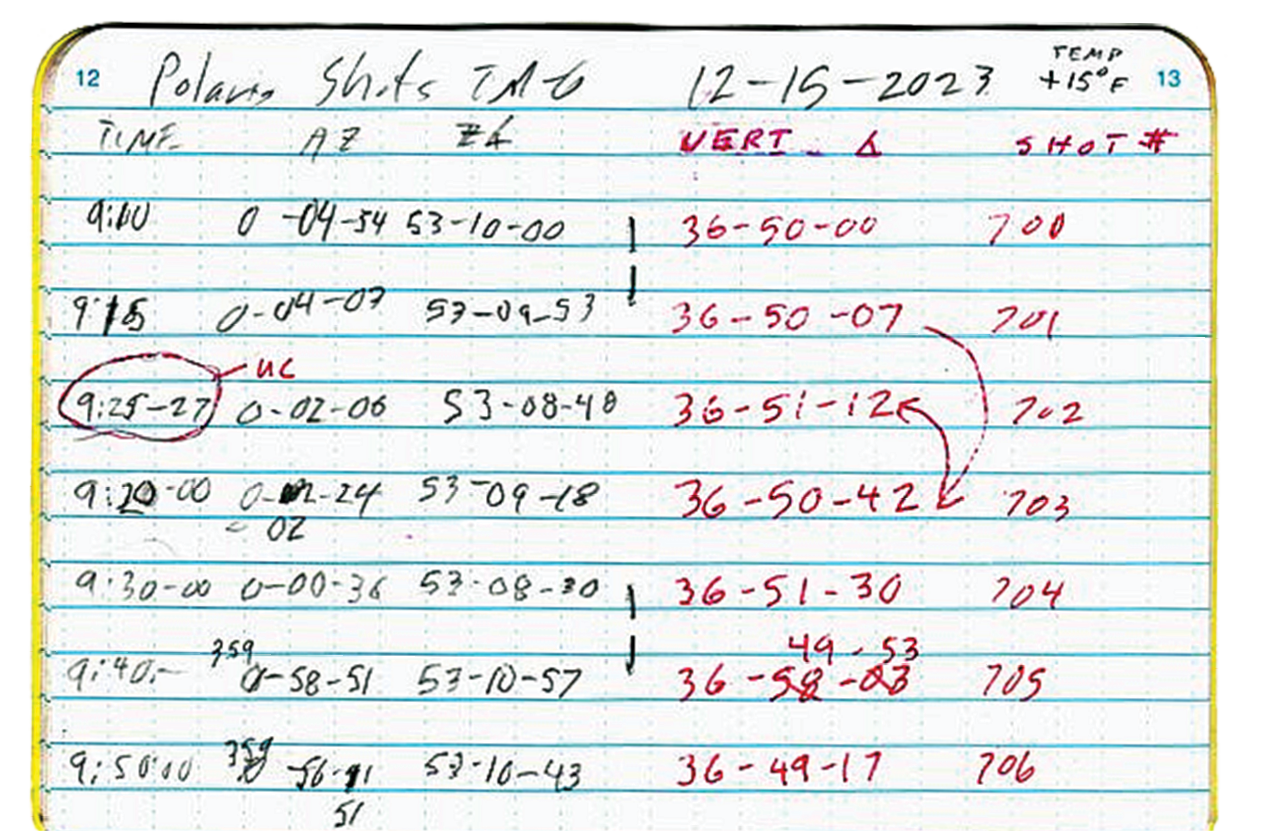
Raw field notes for shots Dec 15, 2023. Zenith angles converted to vertical angles in red. Book was 3” x 4-1/2” mini-notebook using gloves making it hard to write at 15 degrees F in the dark for one hour.
A classic refractor hasn’t changed much since Galileo used one to observe Jupiter and its four major moons in 1609 with his dinky one inch, 8 power magnification. About the only thing that’s changed over the centuries is glass and magnification. The same could be said for the Newtonian. Only recently in the 1960’s has the Cassegrainian design been perfected for the amateur market as affordable. A really, really good refractor (an apochromatic three element design versus an achromatic two element configuration) still costs about a thousand dollars per inch while the other mirrored scopes are half that. But that expense for both continues to plummet as we speak. The optics in most surveyors’ lenses are still achromats but with special coatings to reduce glare and internal reflections from the glass elements of their two-element construction. Also, they are not usually used at night and can get by with small apertures and relatively low magnification.
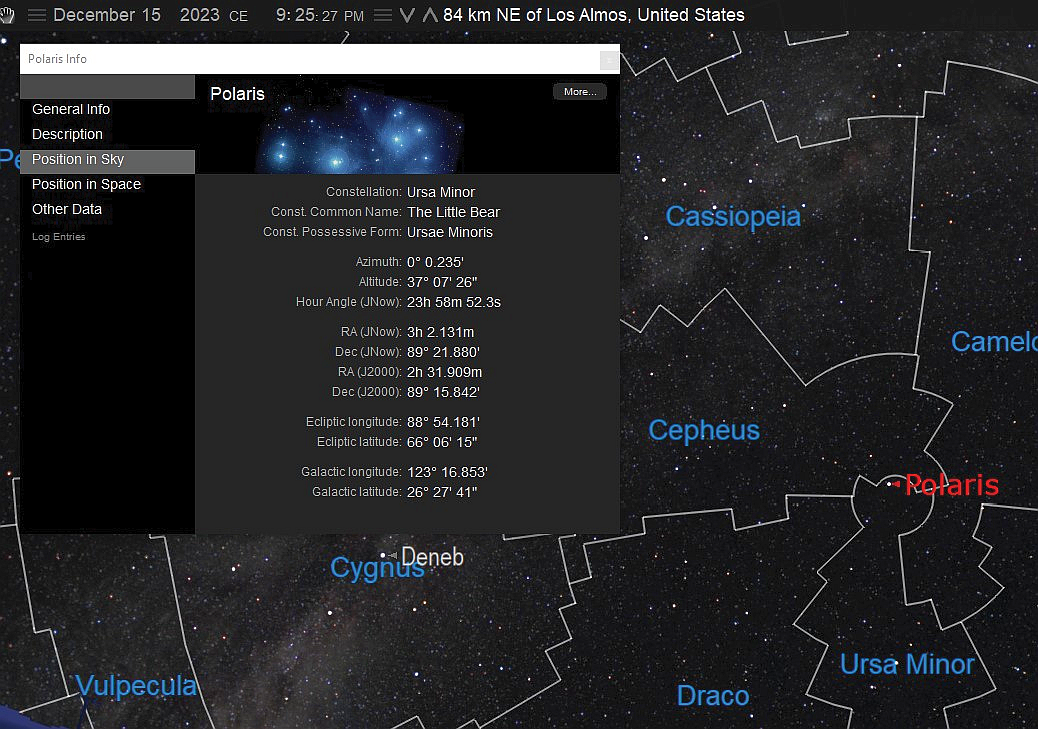
Starry Nite Pro ephemeris data for Polaris on Dec. 15, 2023, at Upper Culmination (UC in red @ field book azimuth).
Now let’s talk about the mounts which is where my experiment using an old theodolite comes into play. Amateur astronomers have various methods to find the true north. So do surveyors but it is not usually in the amateur arsenal because they do not possess the equipment nor expertise.
I indicated that my stock of telescopes comes in five types. First, I have a 12” Newtonian (remember that when I say inches it means the size of either the primary mirror in a reflector or the objective lens on a refractor). It is on what’s called a Dobsonian mount which is the least expensive because it is basically a lazy Susan alt/az in a rocker box1.
Second is a 12” Cassegrain in my eight-foot diameter observatory dome that is also on an alt/az fork mount. Next is an 8” Newtonian on a German equatorial mount which is one of the most popular but also the most difficult to align2.
Fourth follows with another 8” Cassegrain but is a modified alt/az fork mount that is on an equatorial wedge which you angle the telescope for your latitude to roughly point at Polaris3.
Fifth is a classic 6” refractor that is a long four-foot tube on another German equatorial mount. A refractor like this is why there are so many more of the reflectors because they do not fold the optics with mirrors but shoot the light down a long narrow tube to the eyepiece a long way in back. They are the hardest on your neck because of their length for the resulting focal ratio.
All of these except the 6” refractor have computer drive systems to roughly track the stars. The 12” Newtonian and 12” Cassegrain have GPS controlled drive systems while the pair of 8” reflectors have just the drive systems that have to be aligned on Polaris every night for a setup. It is the 8” on the equatorial wedge that I am building a pier mount to try to polar align with a theodolite.
Most precision polar alignment techniques use a process called the star drift method that is long and cumbersome for hours at the scope sighting stars for long periods of time to see which way they drift in the eyepiece up and down. The “simplified manual” on how to do this is over twelve pages long!
Getting lined up on Polaris is just the first step in precise polar alignment for a telescope to track the stars for more than about a half hour at high magnification without drifting out of the field of view. Today’s CCD chip cameras need more accuracy to shoot for hours at a stretch. Polaris varies from the true north celestial pole by a little over a one-degree circle in 24 hours. This is where my theodolite that reads to six seconds of arc may come in. Also, at longer play is the precession that makes the apparent pole star wobble in a twenty-six-thousand-year 23.4-degree circle to come back to where they started on Polaris. But this long-term spinning top only changes about every 50 years to affect ephemeris tables significantly. The star positions in standard ephemerides changed from 1950 calculations to 1980 when Polaris was closest to true north and now adjusted to epoch 2000 as the separation is now increasing.
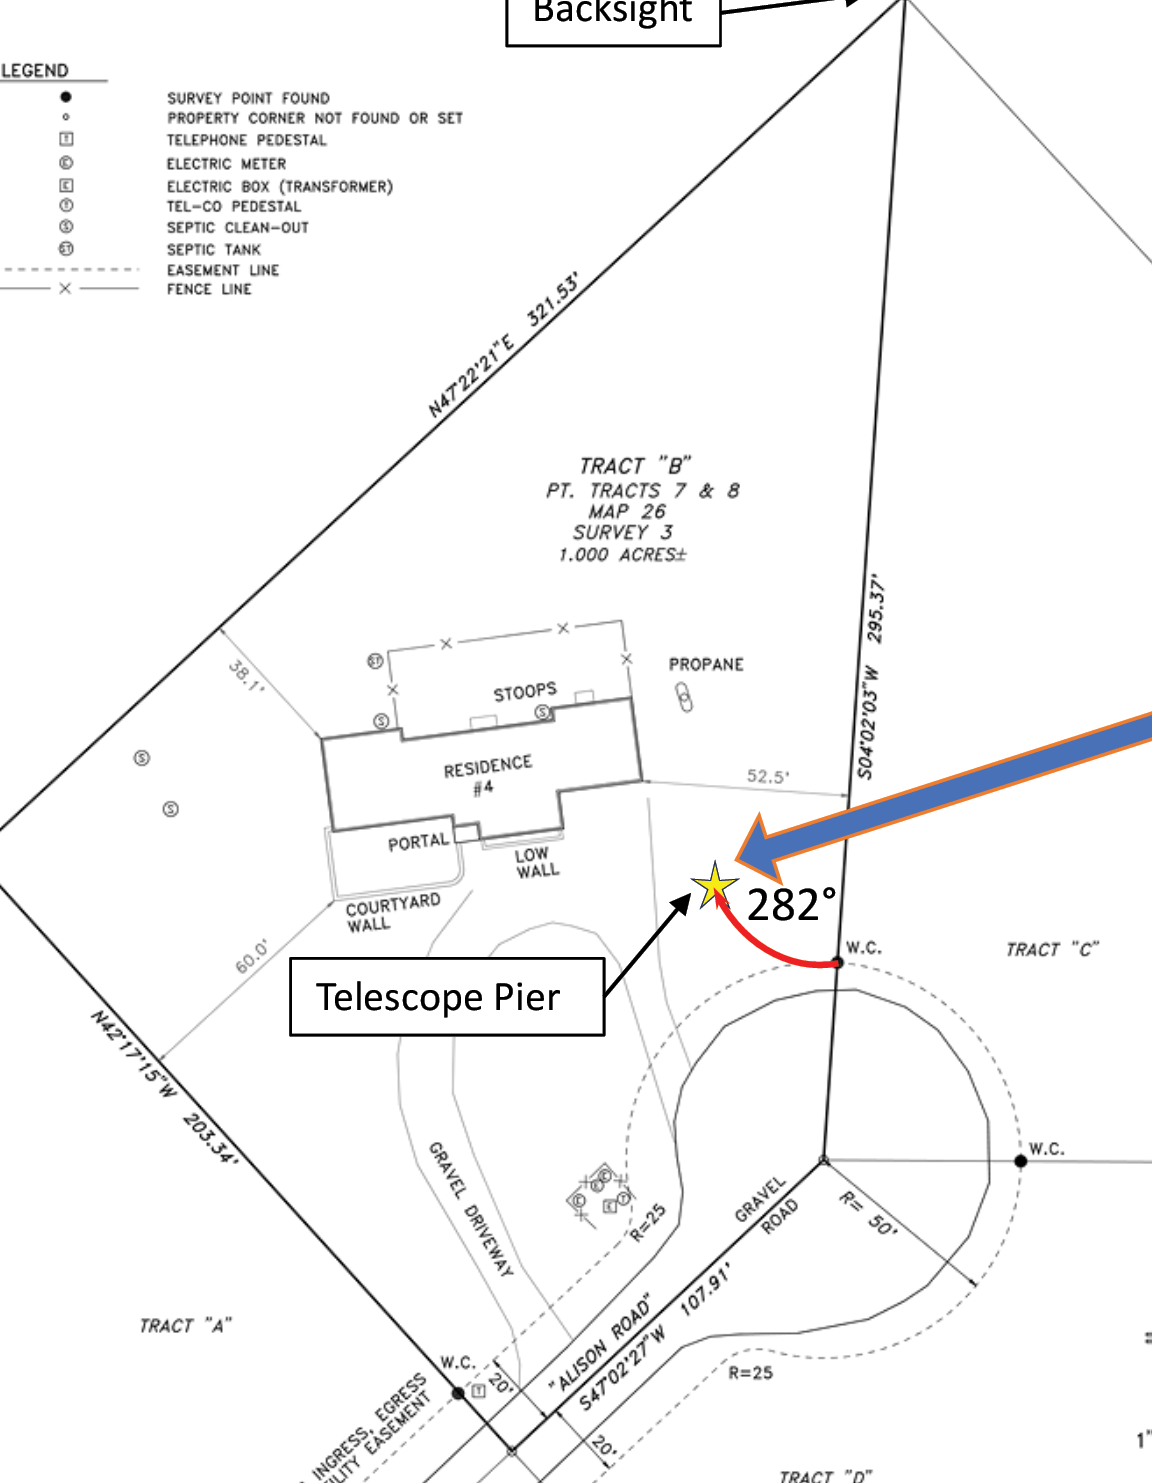
But for my purposes I have several planetarium software programs that will give you tables for every celestial object to the nearest second using the current ephemeris tables. So first I lined up my instrument on the two intervisible survey caps of my lot that were set in 2007 using differential GPS positions for bearings off a 300’ backsight. I then turned an angle to the center bolts of the concrete pier to establish a new bearing. The short 30-foot foresight distance was irrelevant because I was just interested in the azimuth.
Now that I had a pretty good azimuth, I occupied the four bolts center position to turn an angle to Polaris for that night. Since upper culmination occurred about a half hour before midnight (Polaris also has lower culmination when it is below the north along with greater eastern and western aspects, but they are in six-hour segments). So, shooting Polaris later in the morning was not an option and at 5:30 pm was too early to be seen. I shot it on five different nights using half hour timings starting at 10 pm and later just took shots around upper culmination once I got comfortable with the process
What was the resulting positional accuracy using all the data and my layout for a true north line for the telescope? That’ll be in the next chapter of a future article once I set the telescope on the pier and give it a test drive.
Martin Gutoski has been an amateur astronomer since 1974, an Alaskan Professional Land Surveyor since 1988 and holds a BA and MA in Archaeology from the University of Alaska Fairbanks in 1992 and 2003, respectively. He has lived in Alaska since 1960 but overwinters (snow birding as it is called) in Taos, New Mexico since 2017 to avoid any more winters there but returns to Fairbanks from Memorial Day to Labor Day to do archeology and land surveying when the snow is gone and the sun is up 24/7.