In Part One of this article, we looked at some basic radio terms and basic equipment setups. In this Part Two, we’ll dive right into some advance equipment setups, and then look at a few field examples of these techniques in action.
Level 2, a better upgrade: Base & Rover with internal radios using a repeater
 So what’s a better solution than just buying an external radio tethered to your base with a ‘Y’ cable? Introduce, the repeater function on your external radio! This is the same amount of gear as listed in Part One of this article with possibly a second external battery to run just the radio and\or the base.

(The equipment I use at my day job is Trimble, so that’s what I’m most familiar with, but I think most of what I’m recommending is also available to other brands of survey equipment. Pacific Crest sells a radio called the ADL Vantage that works with many brands of equipment.)
There is a bit of reconfiguring to be done in your ‘survey style’ (telling the base that it is going to talk to a repeater using the internal radio instead of talking to a radio connected by a cable) but this only has to be done once, just like when you configured the base to use either an external or internal radio in the first place. Your equipment vendor can help you do this.

Above is an external 5dB whip antenna at the base. The antenna is connected directly to a pole clamp that is attached to the quick release on the base.
I’d also recommend that if you make the switch to “repeater mode”, you also never go back to using the ‘Y’ cable, because that requires configuring survey settings in the background every time you go back and forth. Remember the KISS principle, pick one configuration and stick with it. You’re not losing any functionality when “cutting the cord” so to speak, as you can still set up a radio repeater five feet from your base if you like, just like you did when you used the ‘Y’ cable. The difference when using a repeater is you now have the option of moving the radio repeater to a better broadcast location to maximize your range. That location can be five feet or miles away, so this is an enormous improvement right off the bat. You also are not required to use a repeater as the rover will automatically select whatever signal is strongest and use that. In fact, just because you have configured to have the option of using a repeater, you may choose never to set one up (assuming you never go out of radio range from the base on the job you are on).
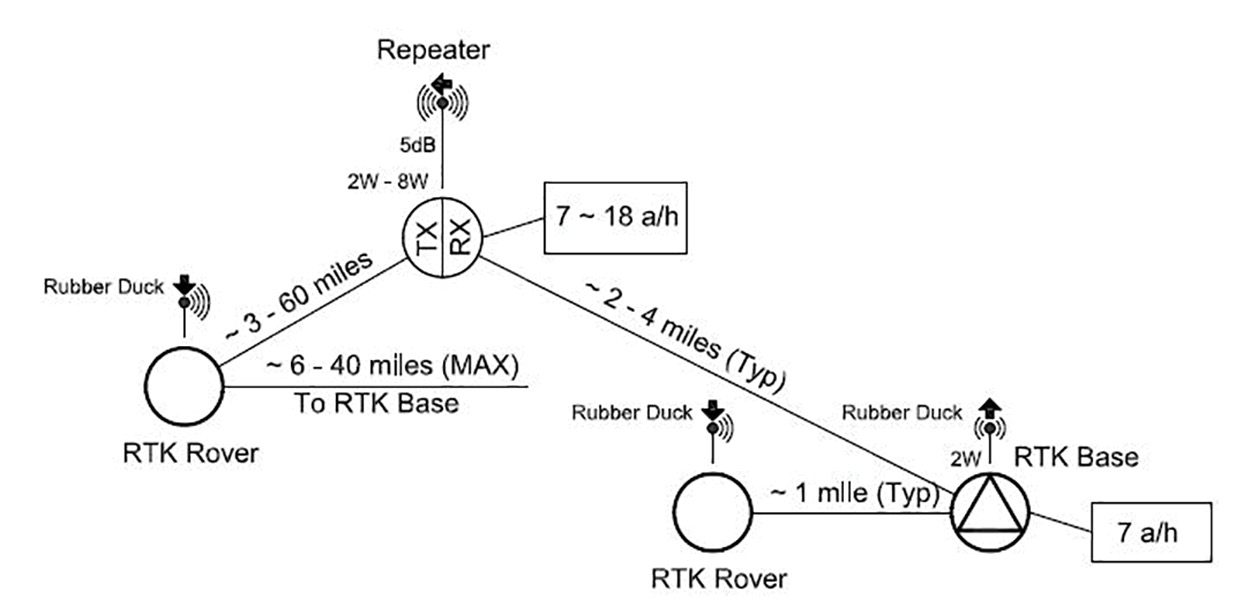
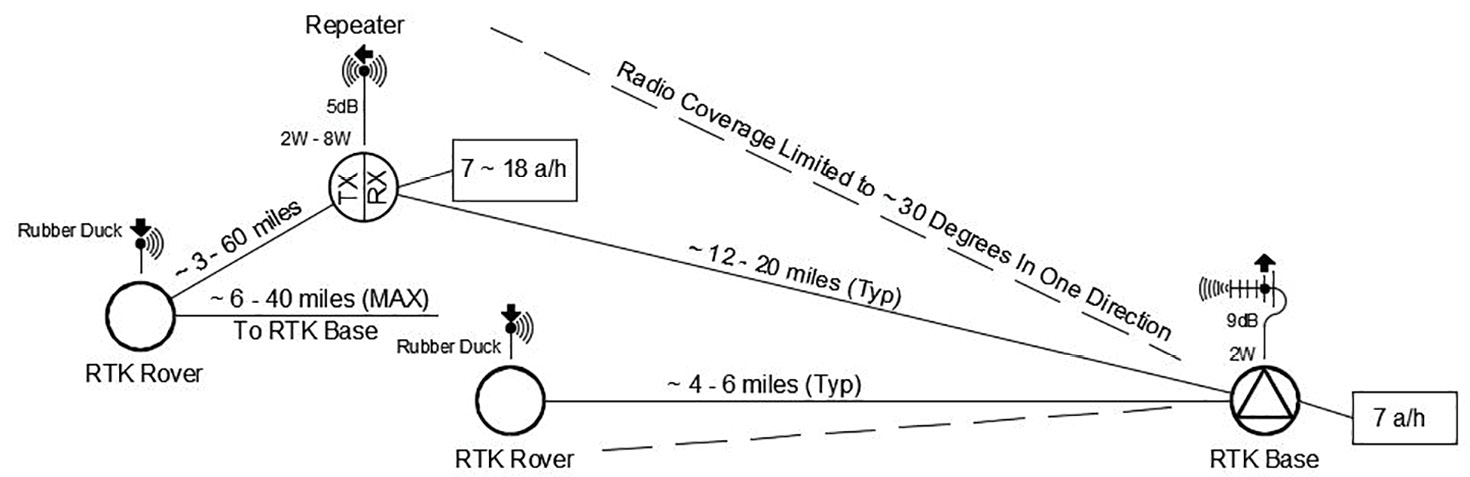
There is another point to be made here about radio range. The repeater has a more sensitive 5dB whip antenna and can get further from the base than the rover can. The rover’s rubber duck antenna is less sensitive and can’t get as far. In the illustration above the Rover is only a mile away where the repeater with 5dB whip can get a few miles away. The repeater can do this because it can “see” from further away (like looking at something with the naked eye, the rubber duck versus through binoculars, the 5dB whip).
Level 2 conclusion
The cost: The only potential cost is there may be an extra battery required for the base (although technically it can run for several hours on internal battery). I recommend you always run an external battery at the base, however. A 7-amp hour battery is sufficient for most modern receivers to run 8 – 12 hours in 2-watt transmit mode.
The return on investment: Unshackling the Repeater from the Base gives you a potential 2 – 15 times improvement in your range by giving you the option to put the repeater in a better location (up high on a hill, at the ‘corner’ of something blocking your radio, etc.). Having better radio placement usually means you can run the radio at a lot less power too. I’ve had a lot of luck using just 2 – 4 watts most of the time. A smaller battery can also be used for a low power repeater, like an 18-amp hour size, and still run all day on 4 watts. In the last field example at the end of this article, I got 65+ miles of range while only using 8 watts of power from a mountain top repeater. Remember what they say about real estate, location, location, location. Where your radio sits, is a lot more critical than how much power you use.
Level 3a, a better external antenna at the Base, the 5dB gain whip
 The next recommended improvement is to upgrade the external antenna at the base from a rubber duck to a 5dB whip. See Part One for more information about antenna types.
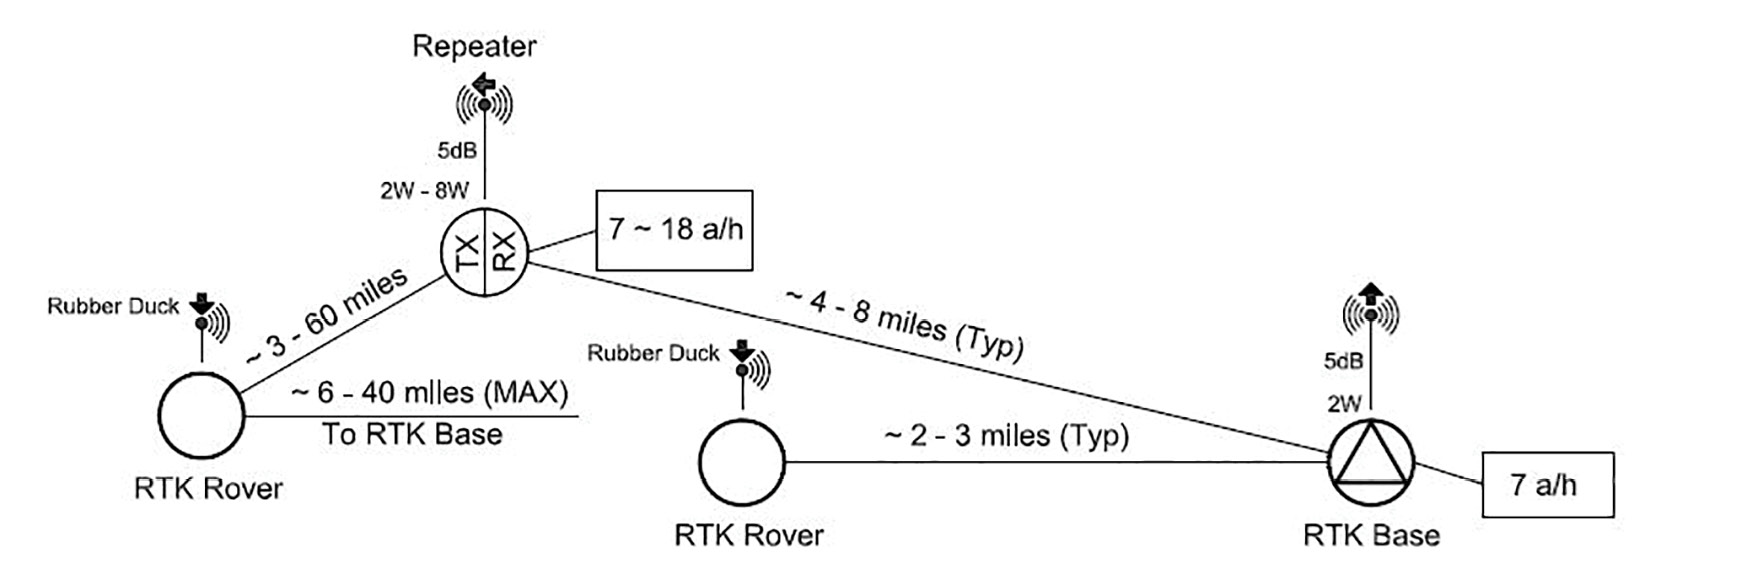
Like I mentioned in ‘Level 2’ above, you can choose to not set up a repeater at all. If you’re looking to upgrade a ‘Level 0’ system (See Part One of this article), but don’t have the $2,000 – $4,000 to buy the external radio kit, a $300 – $500 external antenna kit is your best intermediate option. As you can see in the illustration on the next page, having an external 5dB whip antenna at the base can boost your range by a few miles. This can be a very cost-effective option to get past the one-mile limit.
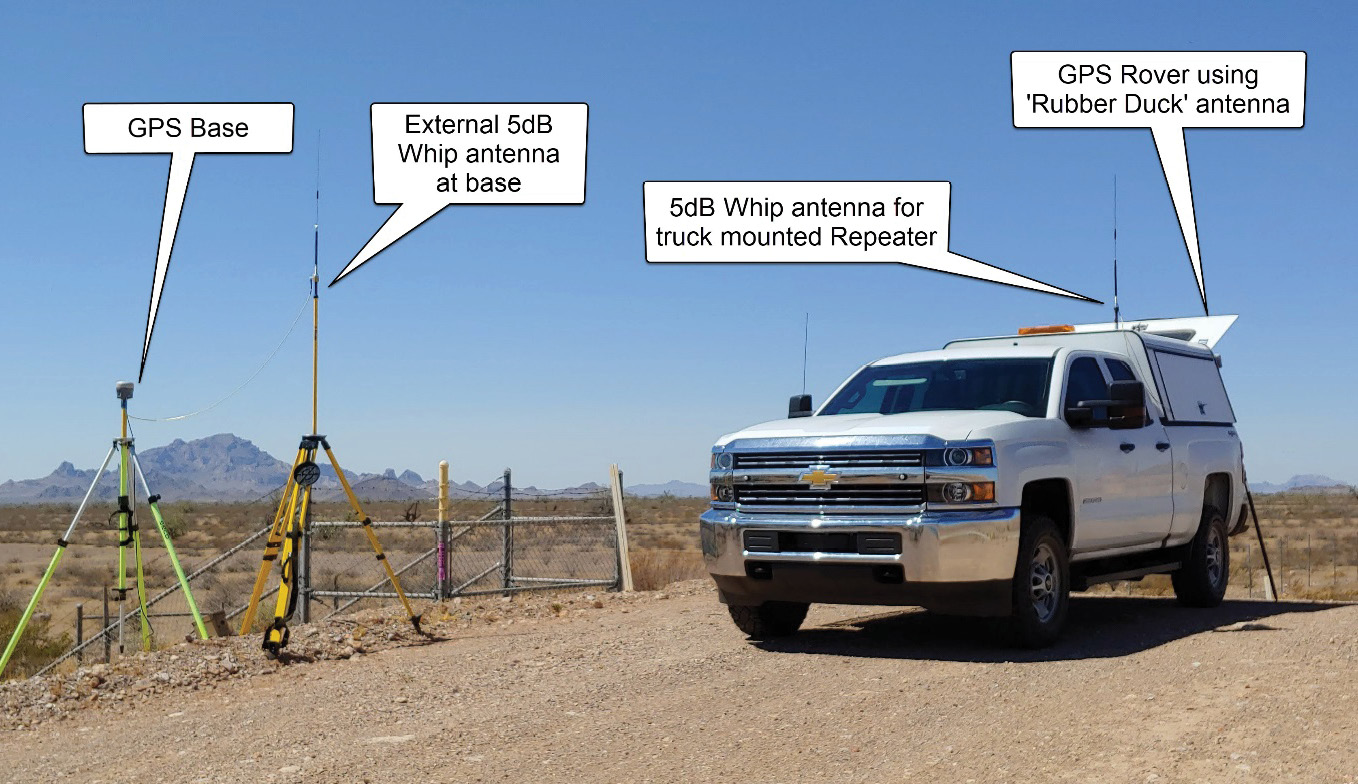
Pictured above from left to right is a base with an external 5dB whip antenna, a 5dB truck mounted repeater antenna and a rover with a rubber duck antenna
This setup is also the most typical one I run on any given day. I set up the base with an external 5dB whip, start working away from my base and when I start to lose radio, I mount an antenna to the top of my truck and start running the repeater right from there. Solves 80% of the radio problems and doesn’t leave any extra equipment out that I need to worry about not being there when I come back. This is also very handy when I walk away from the truck to tie one of those hike-to points and I want to make sure I have radio coverage when I get there.
Level 2 conclusion
The cost: For just a few hundred dollars, you can only add an external 5dB whip antenna to the base. This often can give you enough range from the base to the rover and may not require a repeater at all. Having the 5dB whip at both the base and the repeater makes achieving radio coverage on larger projects much simpler and gives you a lot more field adaptable configurations to try right on the spot to finish a job.
The return on investment: Upgrading only the base antenna is probably the biggest return on investment you will have. Also having a repeater gives you many more options to finish a job and is worth every penny when you compare having to move a base and\or setting additional control on a project to get that “last shot”.
Level 3b, another external antenna option at the Base, the 9dB gain Yagi
Yagi antenna at the base.
When talking about external antennas at the base my favorites are the 5dB whip and a 9dB Yagi. The 5dB whip is a pretty common offering from most manufacturers and survey shops. It’s also the antenna I described in the previous section. The 9dB Yagi is a little bit harder to find if you’re only looking at your typical survey shop, but it’s easy enough to find if you don’t mind ordering on-line and having a cable made to fit your equipment. Yagi’s have a few quirks when using them, so they’re not as universally simple as an omnidirectional 5dB whip, but also not beyond the skill set of the majority of field crews to set up properly. The biggest quirk of a Yagi antenna is it really only works in one direction, the direction it is pointing in. See Part One for more antenna types.
 It’s worth having however because it has several advantages. First, it concentrates the radio energy in one direction and gives you more range. It’s not creating energy but think of it like a flashlight that you can focus down into a beam. It may not light up the entire room (blind spots), but you can see better in a select area that is also further away. This is very helpful when trying to reach a repeater that is many miles away on a mountain top or when trying to get around otherwise impossible obstacles like small hills or dense urban areas with lots of ‘background noise’.
Field Example 1
Base connected to an external Yagi antenna using a 50 foot run of low loss LMR400 coax cable. Yagi is connecting to a mountain top repeater to provide radio coverage to the entire job.
Using external 5dB whip at the base and a radio repeater. The base was setup at 33°33’50.7”N, 112°59’21.8”W with 5dB whip, 6 feet above ground and 2-watt internal radio. This control point is on a small hill about 10 feet higher than the surroundings.
Radio coverage to the east was 6 miles to 33°35’41.0”N, 112°53’16.9”W. After the first few miles the rover started going out of range, so I turned on the repeater that is mounted to the truck. This extended the listening range to the full six miles of the job. The repeater was set to the lowest power setting also because all the shots were less than a few hundred feet from the truck.
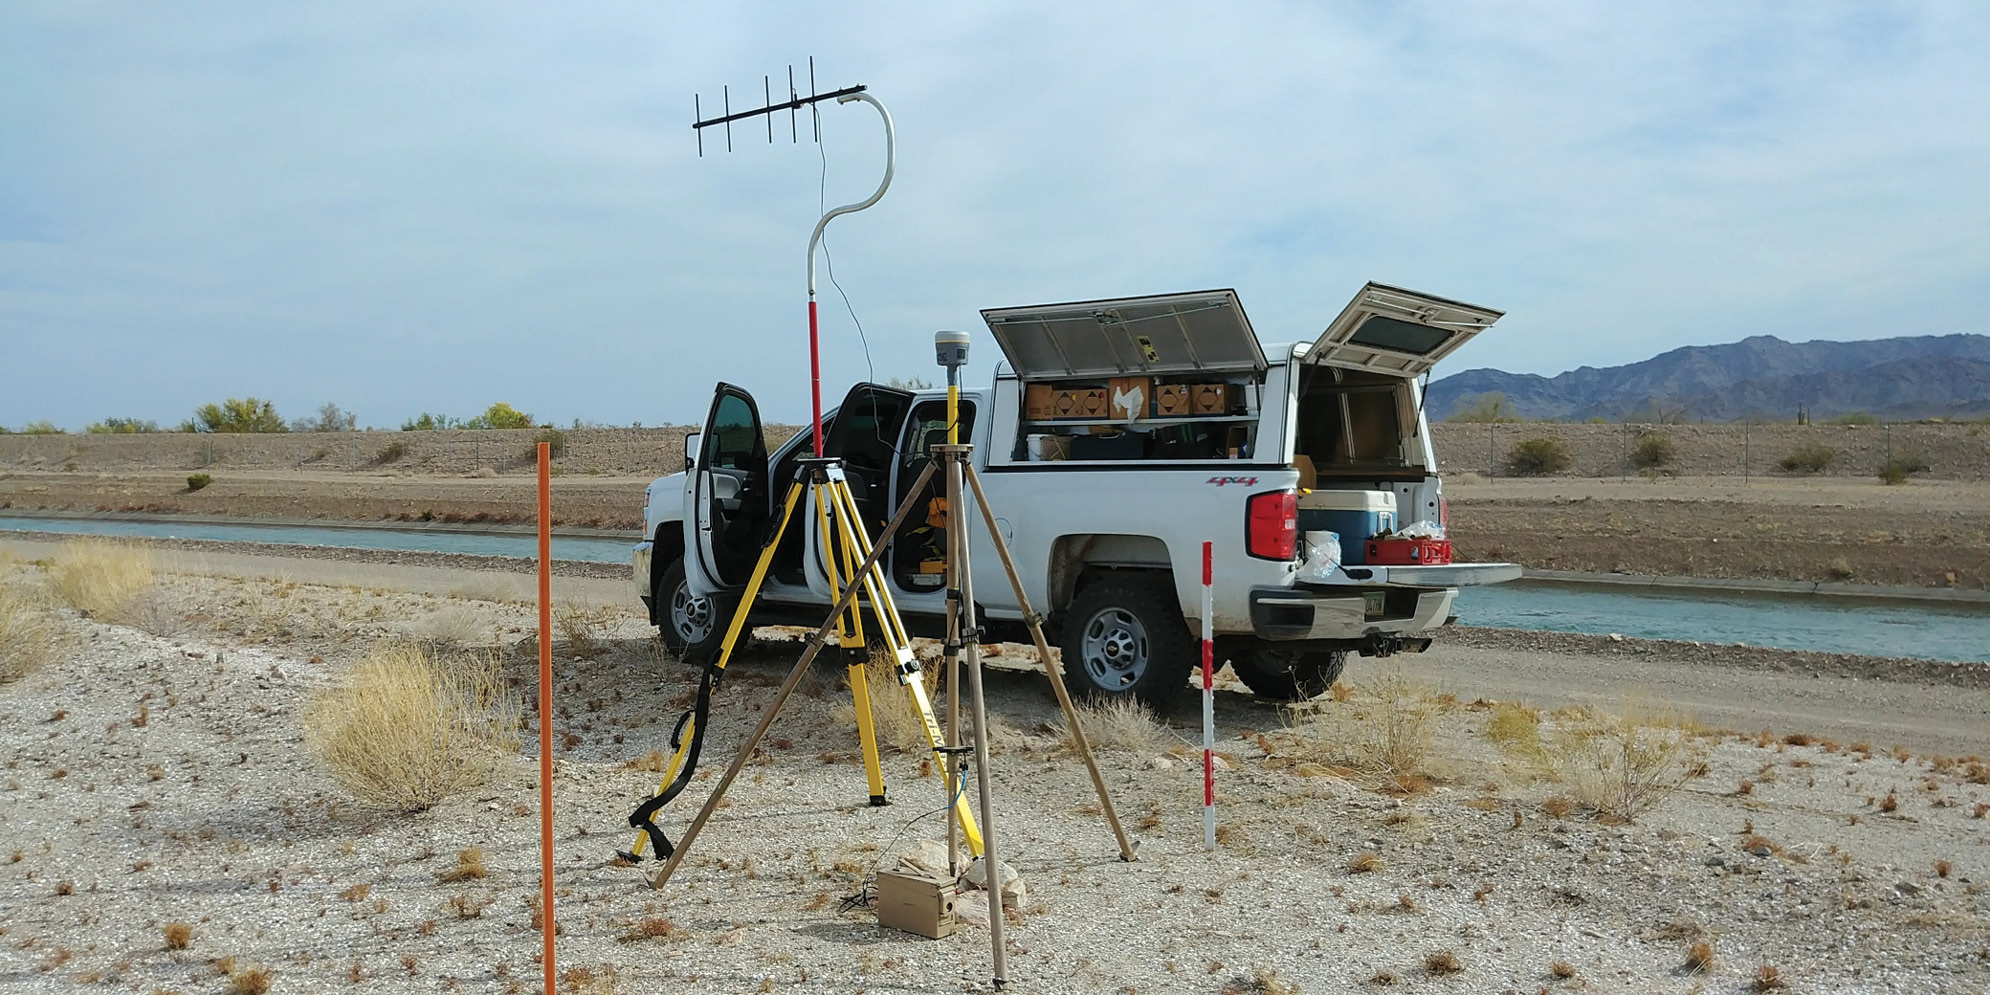
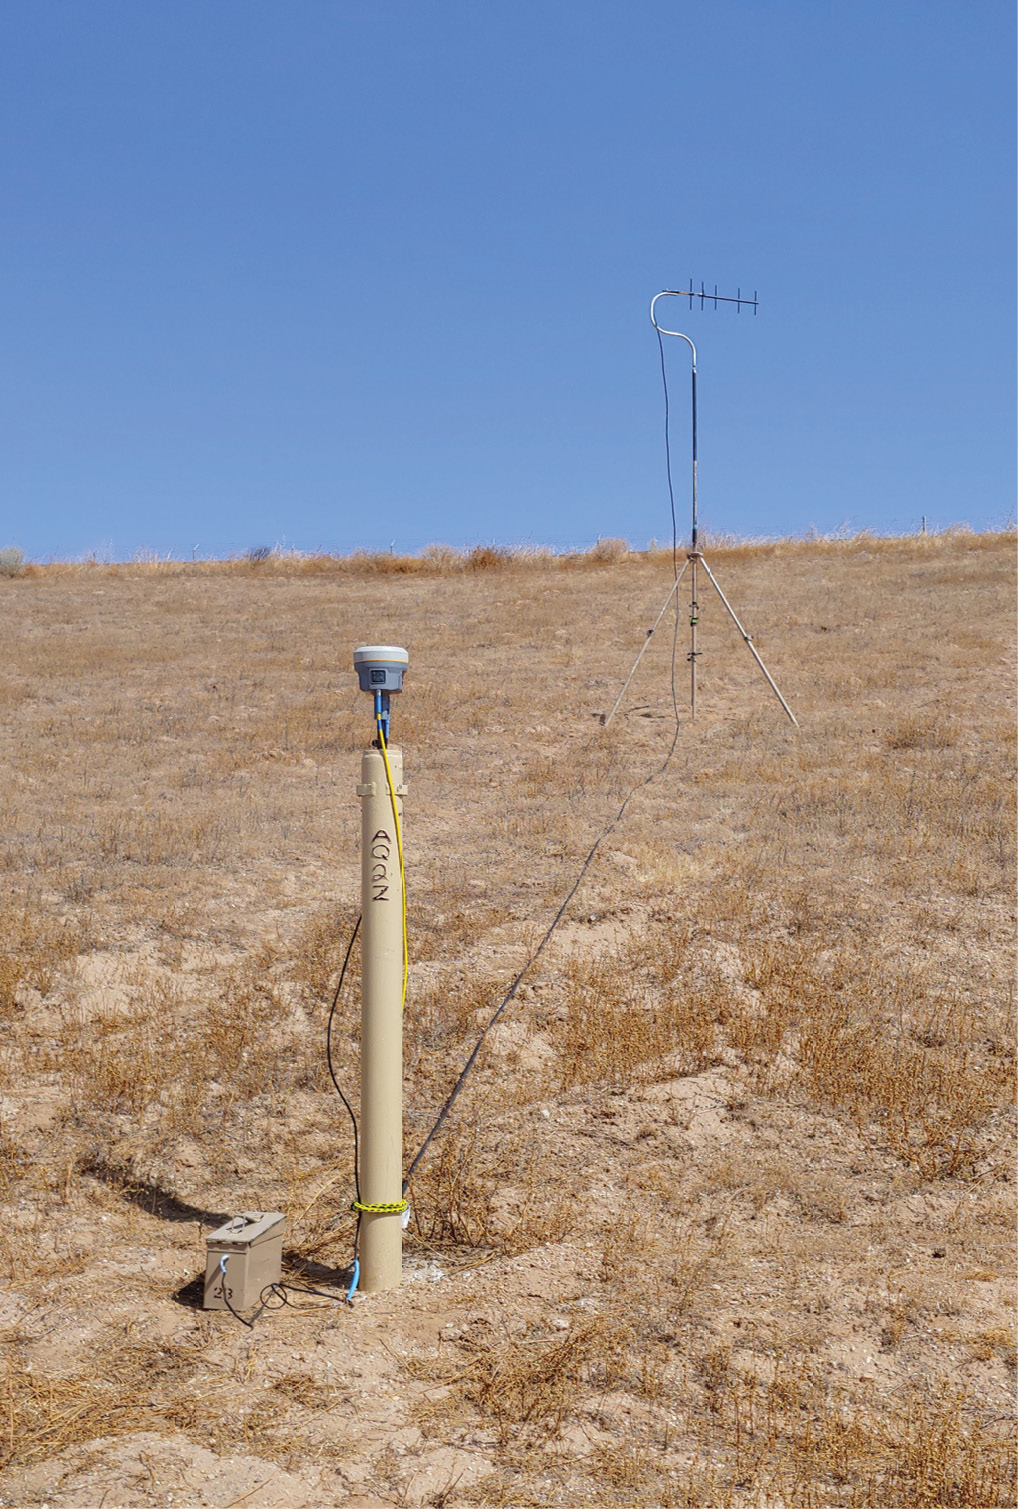
Westerly I used a truck mounted repeater as described above until it hit a radio shadow from some large hills about five miles from the base. To get around this I mounted the repeater on a tripod and left it behind at 33°31’57.5”N, 113° 03’55.6”W (five miles from the base). This extended coverage to 33°32’28.5”N, 113° 05’23.6”W (6 miles from the base). Pictured to the right is an example of a tripod mounted repeater.
Two factors assist in extending the range: the 5dB antenna receives signals better than the rover’s rubber duck; mounting the antenna to the top of the truck gives it a bit more height, about 10 feet above ground. In this mode, and if you’re working right around the truck the absolute lowest power setting is more than sufficient. Lower power settings do a few things. Most notably not overheating the radio and also not running down the battery.
Field Example 2
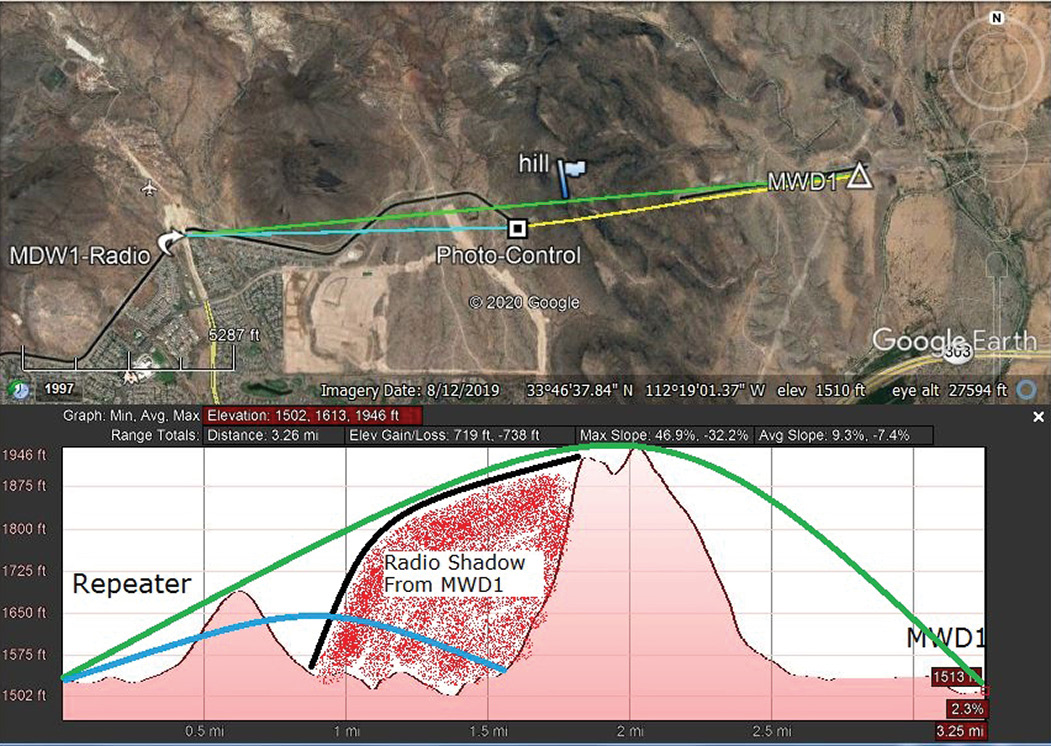
Location of the base at MWD1 using a Yagi antenna to “bend” radio over a short hill. A repeater on the opposite side of the hill provides coverage back into the “radio shadow”
Using a Yagi antenna at the base and a radio repeater to get around a radio shadow. The base was setup at 33°46’52.6”N, 112°17’8.9”W with 9dB Yagi, 7 feet above the ground and 2-watt internal radio. Rover headed westerly along city streets to start of access road, 3.25 miles distant from the base at 33°46’37.5”N, 112°20’30.5”W and beginning of radio range as it “bends” over the 450-foot-tall hilltop (33°46’46”N, 112°18’36”W). Radio repeater was set up with 5dB whip and 2-watt radio. Rover continued easterly towards hill and tied photo control ending at 33°46’39.6”N, 112°18’51.1”W. Normally this would be in full radio shadow of hill, but repeater fills in coverage.
Field Example 3
Base at 33°40’04.6”N, 112° 00’22.5”W using Yagi and 50-foot LMR-400 coax cable to transmit 11.4 miles to Thompson Peak, 33°38’40”N, 111°48’45”W. This control point is located at the base of an earthen berm that blocks the view of the peak. The cable to the Yagi is first run uphill, then goes vertical about 12 feet. This doesn’t fully extend above the berm for clear line of sight but is sufficient to make contact with the peak. It also is a nice compromise between having a cable that is too long and a temporary antenna that is mounted too high in the air (risking being blown over in the wind). On the peak a 5db tower mount antenna running an 8-watt repeater is professionally and permanently installed.
This setup allows for full radio coverage in a high noise urban environment. The furthest shot taken from this control point is some 10 miles to the east at 33°36’15”N, 111°50’58”W.
Out of pure curiosity, we also tested radio coverage from this site and were able to run a rover some 65 miles away at 32°45’33.6”N, 111°25’29.6”W. I’ll talk about the practicality of this in the final thoughts section.
I have attempted to connect a base using a Yagi from further distances but have been unsuccessful at ranges over about 20 – 30 miles when using the 2-watt internal radio on the GPS. I also start to get mixed results in the last few miles of that limit. The goal in my opinion is to get quality coverage from the repeater to the rover, but not too much distance from the base to the rover. Most reasonable expectation are to limit your base-rover distance to less than 10 or 15 miles, with the best vertical results happening really out to 3 – 5 miles, or less (using modern receivers). A possible example of how this can work is to have the repeater some 30 miles in the opposite direction from the base as the rover is going. You can still go out your 15 miles from the base and stay well within range of receiving signals from the repeater (that is some 45 miles away). All this long-range stuff is in the “ideal” case, using a tall mountain. If you’re trying a shorter hill, expect that range to be reduced, possible a lot.
Final Thoughts
Using your external radio as a repeater versus as a hard-wired transmitter can give you a lot more options and better range performance. Better performance can also let you dial back the power on the transmitter. Higher power settings on the radio also mean more power consumption and that has two negative strikes right off the bat. You need a bigger battery, and the radio is prone to overheating (and this is a substantial problem for me as I work primarily in the middle of the Sonoran Desert). Another major problem with running a radio on high power is it draws more power just to operate. This means whatever battery you have will also die more quickly, and once it gets low, the radio starts to “brown out” and range again is reduced significantly. Remember, location, location, location of your repeater and low power.
Just because you can… So now you have the knowhow to take that 40-mile shot! But should you? That’s a tough question, and probably the subject of another article. I’ll leave you with the notion that the further you go, the more a single vector RTK solution degrades. The sweet spot for most work we do is usually under six miles for non-vertical work, and three miles or less for things you want an elevation on, but that’s just a generalization. I’m hopeful that by solving your one-mile radio range problem we haven’t just created a long-range monster. Just like your favorite beer commercial warns you to drink responsible, I’ll close by saying, keep your cables short, your antennas up and please, rove responsibly!
Brian Fisher is a professional land surveyor in Arizona. He is also the volunteer Arizona State Geodetic Coordinator for the National Geodetic Survey.